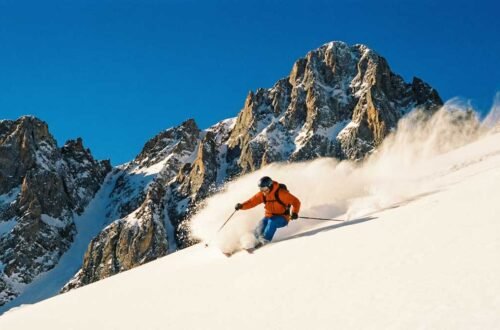
Ever returned from a ski trip only to realize you wore just half of what you packed? Or worse, spent a fortune on a forgotten essential at an overpriced resort shop? You’re not alone. The art of packing for a ski trip is a delicate balance between being prepared for four-season weather in a single day and avoiding the back-breaking strain of an overstuffed suitcase.
Packing for the mountains isn’t like packing for a beach vacation. It demands a strategic approach, considering everything from extreme temperature swings and specialized gear to the dual wardrobes required for on-slope performance and off-slope relaxation. The dry, high-altitude air and intense sun reflecting off the snow create a unique set of challenges that can make or break your comfort and safety.
This guide cuts through the confusion. Forget generic checklists. We’re diving deep into a comprehensive strategy that answers the core question of how to pack for a ski trip. From a revolutionary packing organization system and a detailed ski trip packing list to a clear framework for deciding whether to rent or buy gear, this is the last guide you’ll ever need to pack like a seasoned pro.
Assess Your Trip Before You Pack
The secret to a perfectly packed bag isn’t a magical, one-size-fits-all list. It’s a customized plan tailored to the unique parameters of your trip. Before a single item goes into your suitcase, taking a few minutes to assess the specifics of your destination, trip length, and planned activities will save you from both overpacking and being underprepared.
Trip Duration Matters
The length of your ski vacation is the single biggest factor determining how much you need to bring. A quick weekend getaway has vastly different requirements than a week-long mountain immersion. For shorter trips, you can get by with minimal changes of clothes, but longer stays demand more versatility and planning, especially if laundry access is limited.
Consider this simple framework for clothing quantities:
| Item | Weekend Getaway (2-3 Days) | Mid-Length Trip (4-6 Days) | Week-Long Vacation (7+ Days) |
|---|---|---|---|
| Base Layer Tops | 2 | 3-4 | 4-5 (plan for one wash) |
| Base Layer Bottoms | 2 | 3 | 4 (plan for one wash) |
| Ski Socks | 3 pairs | 4-5 pairs | 6-7 pairs |
| Mid-Layers | 1-2 | 2-3 | 3-4 |
| Après-Ski Outfits | 2 | 3-4 | 4-5 |
Destination Climate Variations
Not all ski resorts are created equal. The dry, often sunny powder of the Colorado Rockies demands a different packing strategy than the frequently wetter, deeper snow of the European Alps or the legendary powder fields of Japan. Research your destination’s typical conditions for the time of year you’re visiting. Pay attention to average temperatures, expected snowfall, and, most importantly, the altitude.
High-altitude resorts mean stronger UV exposure, even on cloudy days, making high-SPF sunscreen and lip balm non-negotiable. The air is also significantly drier, which can wreak havoc on your skin and respiratory system. Spring skiing, with its warmer days and softer snow, requires more breathable layers and less heavy insulation compared to the deep freeze of mid-January.
Your Skill Level and Activities
Finally, be honest about your abilities and itinerary. A beginner sticking to groomed green runs has different gear needs than an advanced skier exploring backcountry bowls. If you’re a first-timer, renting the majority of your hard goods (skis, boots, poles) is almost always the smartest choice. Intermediates might consider investing in their own boots for comfort, while experts will likely have a full setup of specialized equipment.
Don’t forget to plan for your time off the mountain. Will your evenings consist of casual dinners and hot tub sessions, or are there upscale restaurants and nightlife on the agenda? Your après-ski wardrobe can range from simple jeans and a sweater to more stylish, mountain-chic attire. Planning this in advance prevents packing items you’ll never wear.
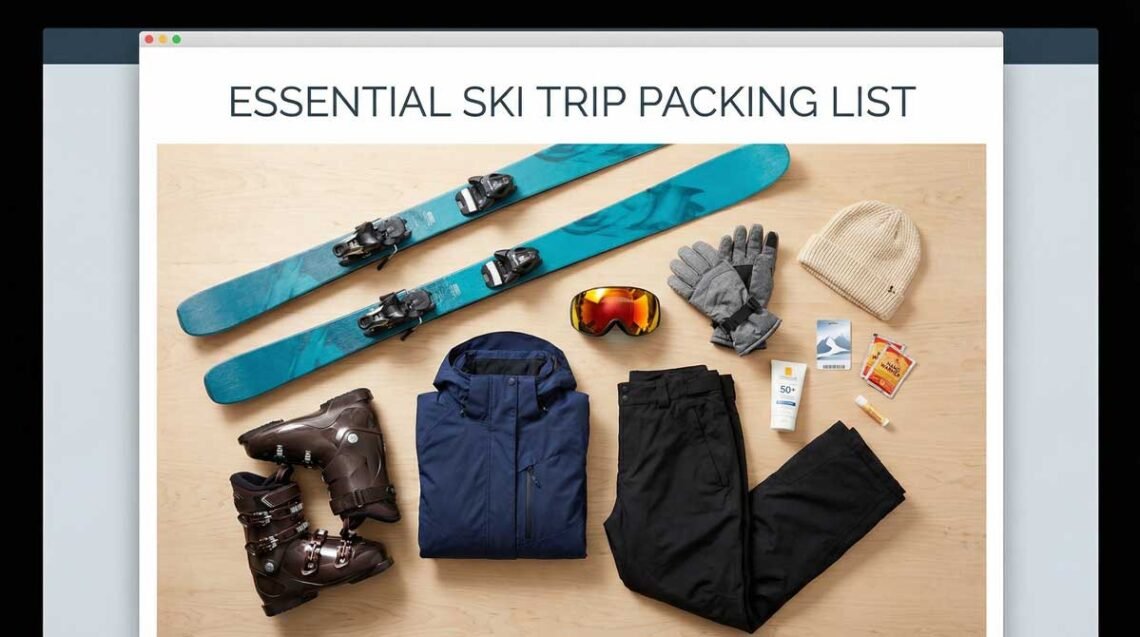
The Complete Ski Clothing Checklist
Building the right ski wardrobe is about creating a versatile system, not just accumulating individual pieces. The goal is to stay warm, dry, and comfortable in a wide range of conditions, from bluebird skies to blizzard-like squalls. This checklist breaks down the essentials, explaining the critical role each item plays in your on-mountain comfort.
The Three-Layer System Explained
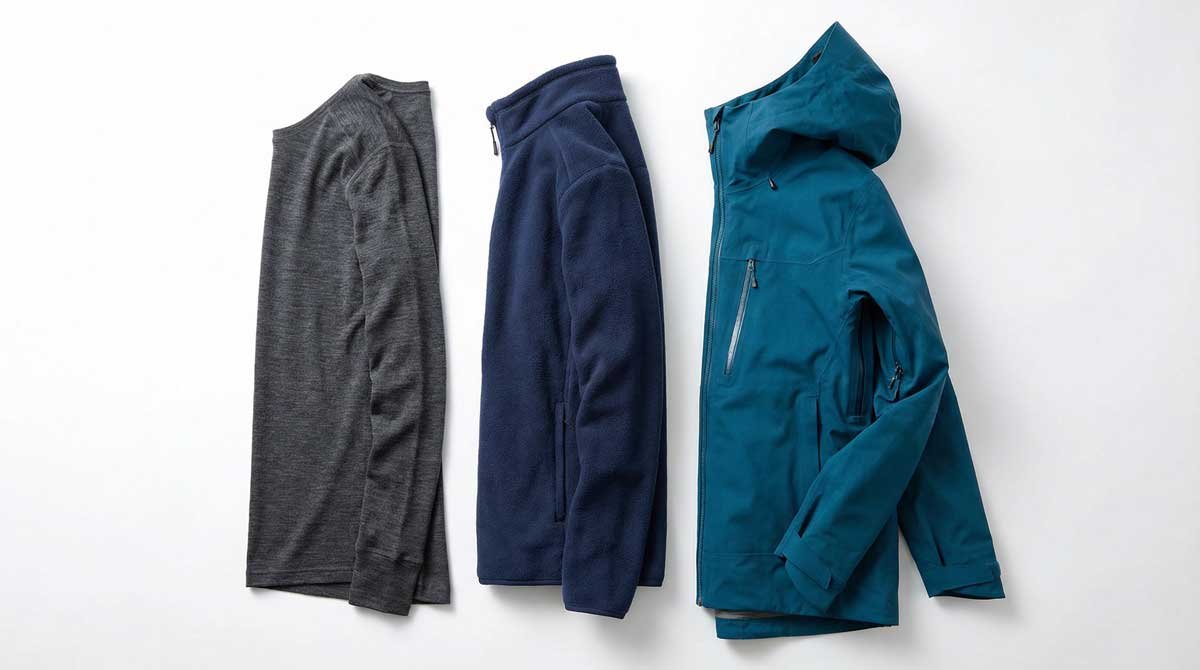
Forget bulky, single-layer jackets. The key to all-weather comfort is the three-layer system. This method allows you to adapt to changing conditions by adding or removing layers, ensuring you’re never too hot or too cold.
- Base Layer: This is your second skin. Its sole purpose is to wick moisture (sweat) away from your body to keep you dry. Look for materials like merino wool or synthetic fabrics (polyester, nylon). Crucially, avoid cotton at all costs. Cotton absorbs moisture and holds it against your skin, rapidly cooling your body and creating a dangerous situation in cold weather.
- Mid-Layer: This is your insulation layer. Its job is to trap body heat and provide warmth. Common materials include fleece, down, and synthetic insulation (like PrimaLoft®). The thickness of your mid-layer can be adjusted based on the temperature. On warmer days, you might skip it altogether.
- Outer Layer (Shell): This is your shield against the elements. A quality ski jacket and pants should be both waterproof and breathable. Waterproofing keeps snow and rain out, while breathability allows the moisture wicked by your base layer to escape. Look for features like taped seams and a high waterproof rating (at least 10,000mm).
On-Slope Essentials
These are the non-negotiable items that form the core of your ski and snowboard attire.
Outerwear:
- Waterproof Ski Jacket: A good jacket is your best friend on the mountain. Look for critical features like a powder skirt (to keep snow out during a fall), pit zips (for ventilation), a dedicated ski pass pocket on the sleeve, and a helmet-compatible hood.
- Ski Pants or Bibs: Like your jacket, these must be waterproof. Many skiers prefer bibs (overalls) as they offer better protection from deep snow and prevent any gap from forming between your jacket and pants.
- Insulated Vest: An optional but highly effective piece for very cold days. It adds core warmth without the bulk of a full second mid-layer.
Extremities:
- Waterproof Gloves or Mittens: Mittens are generally warmer as they keep your fingers together, while gloves offer better dexterity. For very cold conditions, consider a two-part system with a thin liner glove inside a larger mitten.
- Ski-Specific Socks: Do not use regular cotton or even standard wool socks. Ski socks are designed to be tall, thin, and made of a moisture-wicking wool blend. They provide cushioning in key areas without bunching up inside your boot, which can cause painful pressure points.
- Neck Gaiter or Balaclava: Essential for protecting your face and neck from windburn and cold. A merino wool or fleece gaiter is far superior to a simple scarf.
- Warm Beanie or Helmet Liner: A thin, moisture-wicking beanie or skullcap fits comfortably under your helmet for an extra layer of warmth.
Safety Equipment:
- Helmet: This is a non-negotiable piece of safety equipment for all skill levels. Modern helmets are lightweight, comfortable, and can save your life.
- Goggles: Goggles protect your eyes from wind, snow, and harmful UV rays. Invest in a pair with interchangeable lenses. A yellow, rose, or light-colored lens is crucial for enhancing contrast on overcast, “flat light” days, while a dark, mirrored lens is best for bright, sunny conditions.
- Sunglasses: Ideal for warmer spring days or for walking around the resort village during lunch.
Base Layers and Undergarments
This is the foundation of your warmth and comfort. Pack enough for your trip, keeping in mind that synthetic materials can be easily washed and dried overnight in a hotel room.
- Thermal Tops & Bottoms: Pack at least two sets. Merino wool is the gold standard, offering excellent warmth, moisture-wicking, and natural odor resistance. Synthetic options are a great budget-friendly alternative.
- Sports Bras: For women, a supportive, moisture-wicking sports bra is essential.
- Moisture-Wicking Underwear: Again, avoid cotton. Choose synthetic or wool blends to stay dry and comfortable.
What to Pack for Life Off the Slopes
Your ski vacation doesn’t end when the lifts stop spinning. The hours between your last run and dinner—the cherished tradition of après-ski—and the cozy evenings that follow require their own distinct wardrobe. While competitors’ guides often treat this as an afterthought, planning your off-slope attire is key to being comfortable and stylish without overpacking.
The Après-Ski Wardrobe
Après-ski is the social heart of ski culture, ranging from a casual beer at the base lodge to chic cocktails at a mountainside bar. The key is to pack versatile, comfortable, and warm pieces that can be easily layered.
- Warm Sweaters and Fleece Pullovers: These are the workhorses of your off-slope wardrobe. Pack two to three comfortable sweaters or fleece jackets that you can throw on over a long-sleeve shirt.
- Jeans or Casual Pants: A couple of pairs of dark-wash jeans or comfortable casual pants are perfect for most resort town settings.
- Loungewear: After a long day in ski boots, changing into comfortable sweatpants or leggings is pure bliss. Pack one or two sets for relaxing in your accommodation.
- Bathing Suit: This is one of the most commonly forgotten items, yet one of the most essential. Nearly every ski resort and hotel has a hot tub, and there is no better way to soothe sore muscles after a day on the slopes.
Footwear Beyond Ski Boots
Your feet will thank you for giving them a break from rigid, heavy ski boots. Packing the right off-slope footwear is crucial for both comfort and safety.
- Waterproof Snow Boots: A good pair of insulated, waterproof boots with excellent grip is essential for navigating icy or snowy resort villages. You’ll wear these to dinner, to the shops, and for any non-skiing outdoor activities.
- Indoor Shoes or Slippers: Pack a pair of comfortable slippers or casual shoes to wear inside your hotel room or condo. This helps keep your accommodation clean and gives your feet a chance to fully relax.
Evening and Dining Attire
While most ski towns have a relaxed, casual vibe, some higher-end restaurants may have a slightly more formal dress code. A smart casual outfit that packs light is always a good idea.
- Smart Casual Options: For men, a nice sweater and a collared shirt with jeans is perfect. For women, a stylish knit sweater paired with dark jeans or pants works well. There is no need for formal wear, but it’s nice to have an option that feels a bit more put-together for a special dinner out.
- Warm Outerwear: Don’t forget a warm winter jacket (separate from your ski jacket, if possible) for walking to and from restaurants in the evening.
Mountain-Specific Toiletries and Health Essentials
The high-altitude mountain environment presents unique challenges for your skin and body. The air is incredibly dry, the sun is deceptively intense, and the physical exertion can take its toll. A standard toiletry bag won’t cut it; you need to pack a kit specifically designed to combat these harsh conditions.
Skincare for Mountain Conditions
Your skin is your first line of defense against the elements. Protecting it properly is crucial for avoiding painful sunburns and uncomfortable dryness.
- High SPF Sunscreen (SPF 50+): This is the single most important toiletry item. At higher altitudes, the atmosphere is thinner and filters less UV radiation. Sunburns happen faster and are more severe. Apply generously to all exposed skin, including your face, neck, and ears, even on cloudy days.
- Lip Balm with SPF: Your lips are highly susceptible to sun and windburn. A quality lip balm with at least SPF 30 is essential. Reapply frequently throughout the day.
- Heavy-Duty Moisturizer: The low humidity in mountain climates will sap the moisture from your skin. Pack a rich, hydrating face and body lotion to apply in the morning and especially at night to help your skin recover.
- Eye Cream: The delicate skin around your eyes is prone to damage from sun and wind. An eye cream can help soothe and protect this area.
- Aloe Vera Gel: In case you do get too much sun, having a small bottle of aloe vera can provide immediate, cooling relief.
First Aid and Medications
A small, well-stocked first-aid kit can be a lifesaver for minor issues that can arise on a ski trip.
- Prescription Medications: Pack enough for your entire trip, plus a few extra days’ supply in case of travel delays. Keep them in your carry-on luggage.
- Pain Relievers: Ibuprofen or naproxen are excellent for sore muscles and inflammation after a long day of skiing.
- Altitude Sickness Medication: If you are traveling to a resort with a base elevation above 8,000 feet (2,400 meters) and are prone to altitude sickness, consult your doctor about prescription options like Diamox.
- Blister Treatment: New or rental ski boots can cause painful blisters. Moleskin or specialized blister bandages can save your trip.
- Basic First-Aid Supplies: Include adhesive bandages, antiseptic wipes, and antibiotic ointment for minor cuts and scrapes.
Don’t Forget These Critical Non-Clothing Items
While clothing and gear are the main event, a handful of often-overlooked items are the true unsung heroes of a successful ski trip. These are the documents that get you there, the tech that enhances your experience, and the miscellaneous bits that provide comfort and convenience. Forgetting one of these can cause a much bigger headache than leaving behind an extra sweater.
Essential Documents
In the digital age, it’s easy to assume everything is on your phone, but having physical or easily accessible digital copies of these documents is a crucial backup.
- Lift Tickets or Season Pass: Whether it’s a physical card or loaded onto a resort app, this is your golden ticket to the mountain. Keep it in a secure, easily accessible pocket of your ski jacket.
- Identification: A driver’s license or passport (for international travel) is essential for everything from checking into your hotel to ordering a celebratory après-ski drink.
- Health and Travel Insurance Cards: Skiing carries inherent risks. Have your insurance information readily available in case of an accident. For international trips, travel insurance that covers winter sports is a must.
- Confirmations: Keep digital or printed copies of your flight, lodging, and car rental confirmations.
Technology and Electronics
Tech can elevate your mountain experience, but it needs to be protected from the cold and moisture.
- Smartphone and Charger: Your phone is your camera, GPS, and connection to the world. But be warned: cold weather drains batteries at an alarming rate.
- Portable Power Bank: A fully charged power bank is one of the most important tech accessories you can bring. Keep it in an inside pocket to stay warm and use it to revive your phone mid-day.
- Action Camera (e.g., GoPro): If you want to capture your epic runs, bring an action camera with various mounts (helmet, chest) and, crucially, multiple extra batteries.
- Plug Adapters: For international destinations, a universal plug adapter is essential for charging your devices.
Miscellaneous Must-Haves
These are the small things that make a big difference.
- Reusable Water Bottle: Staying hydrated is key to combating altitude sickness. A reusable bottle is both eco-friendly and ensures you always have water on hand.
- Snacks: High-energy snacks like protein bars, nuts, and trail mix are perfect for a quick fuel boost on the chairlift and can save you a fortune compared to on-mountain prices.
- Ziplock or Dry Bags: Invaluable for separating wet gloves or a damp base layer from the rest of the items in your daypack or for the trip home.
How to Pack Efficiently for a Ski Trip
Knowing what to pack is only half the battle. The true art of ski trip preparation lies in how you pack. A strategic approach to luggage and organization can save you from airline baggage fees, make your arrival and departure seamless, and ensure you can find what you need, when you need it. This is the packing masterclass that other guides forget.
Choosing the Right Luggage
Your luggage is the foundation of your packing system. The right combination of bags depends on whether you own your gear and how you’re traveling.
- Ski and Boot Bags: If you own your equipment, a dedicated ski bag and a separate boot bag are essential. Most airlines count a ski bag and a boot bag as a single piece of checked luggage, but always verify this policy before you fly. A padded ski bag protects your skis or snowboard, while a boot bag keeps your most critical piece of gear safe (and often has extra room for a helmet and gloves).
- Checked Luggage: A large duffel bag or a soft-sided roller bag (around 70-90 liters) is often more practical than a rigid suitcase. They are more forgiving when packing bulky items like ski pants and helmets and can be easier to fit into rental car trunks.
- Carry-On Strategy: Even if you check a bag, your carry-on is vital. Always pack your ski boots in your carry-on if possible. Airlines can lose your skis and you can rent replacements, but a lost or delayed boot bag can ruin a trip. Also include a full change of ski clothes (base layers, mid-layer, socks) and any essential medications in your carry-on.
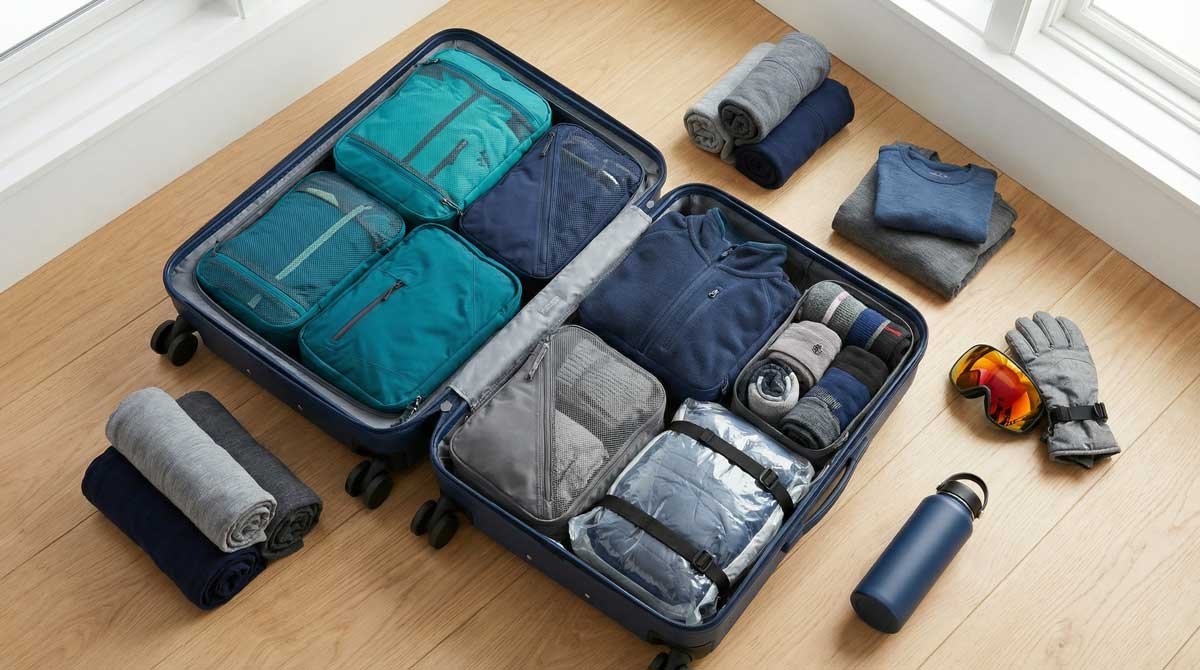
Packing Organization Systems
Don’t just throw everything into a bag. A systematic approach will keep you organized and maximize space.
- Packing Cubes: These are a game-changer for ski trips. Use different colored cubes to compartmentalize your clothing: one for base layers and socks, one for mid-layers, one for après-ski sweaters, and one for casual clothes. This makes it easy to find what you need without destroying your entire suitcase.
- Compression Bags: For bulky items like fleece jackets and sweaters, compression bags can significantly reduce their volume, freeing up valuable space.
- Tech Organizer: Keep all your chargers, cables, batteries, and adapters in one small, dedicated pouch. This prevents a tangled mess and ensures you don’t leave a crucial charger behind.
Strategic Packing Techniques
- Roll, Don’t Fold: Rolling your clothes tightly is a proven space-saver, especially for base layers and casual shirts.
- Wear Your Heaviest Items: Wear your bulkiest jacket (your off-slope winter coat, not your ski shell) and your snow boots on the plane. This frees up a massive amount of space and weight in your checked luggage.
- Stuff Your Boots and Helmet: Your ski boots and helmet are empty vessels. Stuff them with socks, gloves, goggles, and other small items to utilize every square inch of space.
Airline Considerations
Navigating airline policies for ski equipment can be tricky and expensive if you’re not prepared. It’s always best to check the specific carrier’s website for the most up-to-date information before you travel.
| Airline | Ski Equipment Policy | Standard Checked Bag Fee (1st Bag) | Key Consideration |
|---|---|---|---|
| United Airlines | Counts as one standard checked bag (boot bag + ski bag). | $35-$40 | Must be under 50 lbs to avoid overweight fees. |
| Delta Air Lines | Counts as one standard checked bag (boot bag + ski bag). | $30-$35 | Overweight fees apply over 50 lbs. |
| American Airlines | Counts as one standard checked bag (boot bag + ski bag). | $30-$40 | Skis/poles and boots must be packed in separate bags. |
| Southwest Airlines | Counts as one of your two free checked bags. | $0 (First two bags free) | The most budget-friendly option for skiers. |
Pro Tip: Always check your airline’s most current baggage policy before you fly, as fees and rules can change. Weigh your bags at home to ensure you are under the 50-pound limit, as overweight fees can be exorbitant.
Should You Rent or Buy Ski Equipment?
It’s one of the biggest questions facing any skier who doesn’t live a snowball’s throw from a mountain: should you haul your own gear across the country, or simply rent when you arrive? There’s no single right answer—the best choice depends on your skill level, how often you ski, and your budget. This decision framework will help you determine the most logical and cost-effective strategy for you.
When Renting Makes Sense
Renting offers convenience and the ability to try before you buy, making it the default choice for many.
- For Beginners: If you’re new to the sport, renting is the only way to go. Don’t invest hundreds or thousands of dollars in equipment before you even know if you enjoy skiing.
- For Infrequent Skiers: If you only ski a few days a year, the cost of ownership—including maintenance and eventual replacement—far outweighs the rental fees.
- For Air Travelers: Avoiding the hassle and cost of flying with bulky ski and snowboard bags is a major advantage. You can travel lighter and with less stress.
- For Those Who Like to Experiment: Renting allows you to try out the latest models of skis and snowboards each season. If you’re considering a new type of ski, renting a demo pair for a day is a smart move.
- For Kids: Children outgrow gear at a staggering rate. Renting season-long packages locally or daily at the resort is far more economical than buying new equipment every year.
When Buying is Worth It
Owning your gear provides a level of performance, comfort, and long-term value that renting can’t match.
- For Frequent Skiers: If you ski more than 10-15 days per season, the math starts to favor ownership. Your cost-per-use drops significantly, and the gear will pay for itself within a few seasons.
- For the Perfect Fit (Especially Boots): The single most important piece of ski equipment for comfort and performance is your boots. Rental boots are notoriously uncomfortable. Owning your own custom-fitted boots is a night-and-day difference that can transform your skiing experience.
- For Peak Performance: Your own equipment is tuned to your exact specifications and preferences. You know how it will react in all conditions, providing a level of consistency and confidence that rental gear can’t offer.
- For Convenience (If Driving): If you are driving to the mountain, throwing your own gear in the car is often easier than waiting in a rental shop line.
The Hybrid Approach: Best of Both Worlds
For many, the smartest strategy isn’t an all-or-nothing choice.
- Own Your Boots, Rent Your Skis: This is the most popular and often most recommended approach. You get the unparalleled comfort and performance of your own boots while avoiding the hassle of flying with long, heavy skis. You can rent high-performance demo skis at your destination to suit the local conditions.
- Own Your Personal Items: Always bring your own helmet, goggles, and gloves. This is more hygienic and ensures a proper fit for these critical safety and comfort items.
Cost Comparison: A Quick Analysis
| Scenario | Typical Rental Cost (3 days) | Estimated Ownership Cost (Mid-Range Gear) | Break-Even Point (Approx.) |
|---|---|---|---|
| Full Package (Skis, Boots, Poles) | $150 – $200 | $1,000 – $1,800 | 7-9 trips |
| Skis Only | $120 – $150 | $600 – $1,000 | 5-7 trips |
| Boots Only | $50 – $75 | $400 – $700 | 8-10 trips |
This table illustrates that while the upfront cost of buying is high, it becomes the more economical choice for dedicated skiers over time.
Avoid These Ski Trip Packing Mistakes
Learning from experience is one way to master the art of packing, but learning from others’ mistakes is far less painful (and expensive). Even seasoned travelers can fall into common traps when packing for the unique demands of a ski trip. Here are the top mistakes to avoid, plus some pro tips from those who spend their winters on the snow.
Top 10 Packing Mistakes to Avoid
- Packing Cotton Base Layers: This is the cardinal sin of winter sports. Cotton acts like a sponge, absorbing sweat and holding it against your skin, which will make you dangerously cold once you stop moving. Always choose merino wool or synthetic fabrics.
- Forgetting Extra Gloves: A single pair of gloves can easily get wet from snow or sweat. Having a dry backup pair to swap into mid-day can be the difference between a great afternoon and a miserable, cold one.
- Skipping the Sunscreen: The sun’s rays are significantly stronger at high altitudes, and the reflection off the snow doubles your exposure. A high-altitude sunburn is brutal and easily avoidable.
- Not Testing Your Gear Before You Leave: Pull out your jacket, pants, and other gear a week before your trip. The time to discover a broken zipper or a delaminating shell is in your living room, not in a hotel room a thousand miles from home.
- Bringing Only One Pair of Goggles: Goggle lenses can get scratched, or conditions can change dramatically. Having a backup pair or at least a second lens for different light conditions (e.g., a low-light lens for snowy days) is a pro move.
- Underestimating Your Need for Après-Ski Shoes: Your ski boots are not for walking around town. They are uncomfortable, slippery on icy surfaces, and wearing them down on pavement can ruin them. A solid pair of waterproof snow boots is essential.
- Forgetting to Hydrate: Altitude sickness is real, and dehydration is its best friend. Start hydrating a day or two before your trip and keep a water bottle with you at all times.
- Packing Too Many “Real” Outfits: You will likely spend most of your time in either ski gear or comfortable loungewear. Limit your “nice” outfits to just one or two versatile options.
- Ignoring Your Feet: Stuffing two pairs of thick socks into your boots won’t make you warmer; it will cut off your circulation and make your feet colder. A single, quality pair of ski-specific socks is all you need.
- Leaving Home Without Your Insurance Info: Accidents happen. Having your health and travel insurance information easily accessible can save you a world of logistical and financial pain.
Pro Tips from the Mountain Experts
- Activate Hand Warmers Early: Chemical hand warmers take 15-20 minutes to reach their peak temperature. Open them and stick them in your gloves or pockets while you’re getting ready, not when your hands are already frozen.
- Duct Tape is Your Best Friend: Wrap a few feet of duct tape around a ski pole or water bottle. It can be used for emergency repairs on everything from a torn jacket to a broken buckle.
- Pack a Portable Humidifier: For longer trips, a small, travel-sized humidifier can make a huge difference in combating the dry mountain air in your hotel room, helping you sleep better and avoid a sore throat.
- Use Your Hotel’s Boot Dryer: Many ski hotels have boot dryers in the rooms or ski valet area. Use them every single night. Starting the day with dry, warm boots is a non-negotiable luxury.
Your Ski Trip Packing Questions Answered
Even with the most detailed guide, specific questions always come up. We’ve compiled answers to the most frequently asked questions about ski trip packing, drawing from real-world queries to give you the practical advice you need.
- 1. How do I pack efficiently for a ski trip?
- Efficiency comes from a combination of smart choices and techniques. First, use packing cubes to compartmentalize your gear—one for base layers, one for après-ski, etc. Second, roll your clothes instead of folding to save space and reduce wrinkles. Third, utilize every inch of dead space; stuff your ski boots and helmet with socks, gloves, and other small items. Finally, wear your bulkiest items, like your winter coat and snow boots, on the plane to free up significant luggage space.
- 2. What are the absolute must-haves for a first-time ski trip?
- For your first time, focus on the essentials for warmth and safety, and plan to rent your hard goods (skis, boots, poles). Your non-negotiable packing list includes: waterproof ski jacket and pants, a non-cotton base layer (top and bottom), a fleece mid-layer, ski-specific socks, waterproof gloves, a helmet, and goggles. Don’t forget high-SPF sunscreen and lip balm, as the sun at altitude is incredibly strong.
- 3. Is a regular puffer jacket okay for skiing?
- While a puffer jacket is great for warmth, most are not ideal for skiing as a primary outer layer. Standard puffers are typically water-resistant, not waterproof, and will become saturated and cold in wet snow or a fall. They also lack ski-specific features like a powder skirt or sleeve pass pocket. A puffer jacket works best as a heavy mid-layer under a waterproof shell on very cold days, or for wearing around the village for après-ski.
- 4. How can I avoid overpacking for a ski trip?
- The key is to embrace versatility and re-wearing items. You only need one set of ski outerwear (jacket and pants). Pack enough base layers and ski socks for each day, but plan to re-wear your mid-layers and après-ski sweaters. Limit yourself to two or three off-slope outfits. Before you pack an item, ask yourself if it can be worn for multiple occasions. If the answer is no, consider leaving it behind.
- 5. How should I pack my ski boots for travel?
- Your ski boots are your most important piece of equipment. If at all possible, pack them in a dedicated boot bag and bring it as a carry-on. This ensures that even if the airline loses your checked luggage, you’ll have the most critical and hardest-to-replace item with you. If you must check them, use a padded boot bag and stuff them with smaller items to help them keep their shape and maximize space.
- 6. What kind of toiletries are essential for the mountains?
- The dry, high-altitude environment requires a specific skincare arsenal. Your top priorities should be a high-SPF sunscreen (50+), a lip balm with SPF, and a heavy-duty moisturizer for your face and body to combat the extreme dryness. Consider bringing saline nasal spray to help with dry nasal passages and eye drops for irritation from the wind and sun.
- 7. Is it possible to pack for a ski trip in just a carry-on?
- Yes, it is absolutely possible, but it requires careful planning and one major compromise: you must rent your skis, poles, and helmet at your destination. Wear your bulkiest items (ski jacket, snow boots) on the plane. Use compression packing cubes for your clothing. With this strategy, a standard carry-on roller bag and a personal item backpack are more than enough for a trip up to a week long.
- 8. How many base layers do I really need for a week-long ski trip?
- For a seven-day trip, a good rule of thumb is to pack four to five sets of base layers (tops and bottoms). Merino wool base layers have natural anti-odor properties and can often be worn twice before needing a wash. If you have access to laundry facilities mid-trip, you could comfortably get by with just three sets. This gives you enough to have a fresh layer every day or every other day without overpacking.
Your Blueprint for the Perfect Pack
A successful ski trip begins long before you click into your bindings. It starts with the quiet confidence of a well-packed bag. By trading generic checklists for a strategic system—assessing your trip’s unique needs, mastering the art of layering, and packing with intention—you transform a stressful chore into a seamless part of the adventure. You’re no longer just packing clothes; you’re building a personalized toolkit for comfort, safety, and performance.
Remember that the principles in this guide are a foundation. The three-layer system is your armor against the elements. The rent-versus-buy framework is your financial compass. And the packing organization techniques are your key to a stress-free travel day. Use the checklists, consult the tables, and learn from the common mistakes to refine your own perfect method.
Now, you’re equipped with the knowledge that separates the novice traveler from the seasoned pro. Go forth, pack with purpose, and enjoy every moment on the mountain. Your best ski trip ever awaits.
Ready to hit the slopes? What’s the one packing tip you swear by? Share your wisdom in the comments below!
Reference:
[1] TSA. “Special Procedures.” https://www.tsa.gov/travel/special-procedures