A fresh coat of wax is the difference between skis that float effortlessly across packed snow and skis that drag like they’re fighting you every run. Most beginners don’t realize how quickly an unwaxed base degrades — the polyethylene oxidizes, loses its ability to hold moisture, and eventually becomes genuinely harder to repair. Learning how to wax a ski at home isn’t a mechanic’s skill. It’s closer to ironing a shirt.
Regular waxing protects the base, extends the life of your skis, and makes every run feel noticeably faster and more controlled. Skip it long enough, and you’re not just sacrificing glide — you’re shortening the lifespan of an expensive piece of equipment.
What follows covers everything a first-timer needs: how to spot when waxing is overdue, how to pick the right wax for the conditions, a realistic cost breakdown for a starter kit, and clear step-by-step instructions for both hot waxing and the quicker rub-on method. Alpine, Nordic, and backcountry skis each get their own section. No special workshop required — a kitchen table and about an hour will do the job.
How to Tell When Your Skis Need Waxing
Re-wax every 3–5 days of skiing, but the real trigger is what you see and feel — not the calendar. A dry, oxidized base drags against snow rather than gliding over it, and once you know what to look for, the diagnosis takes about thirty seconds.
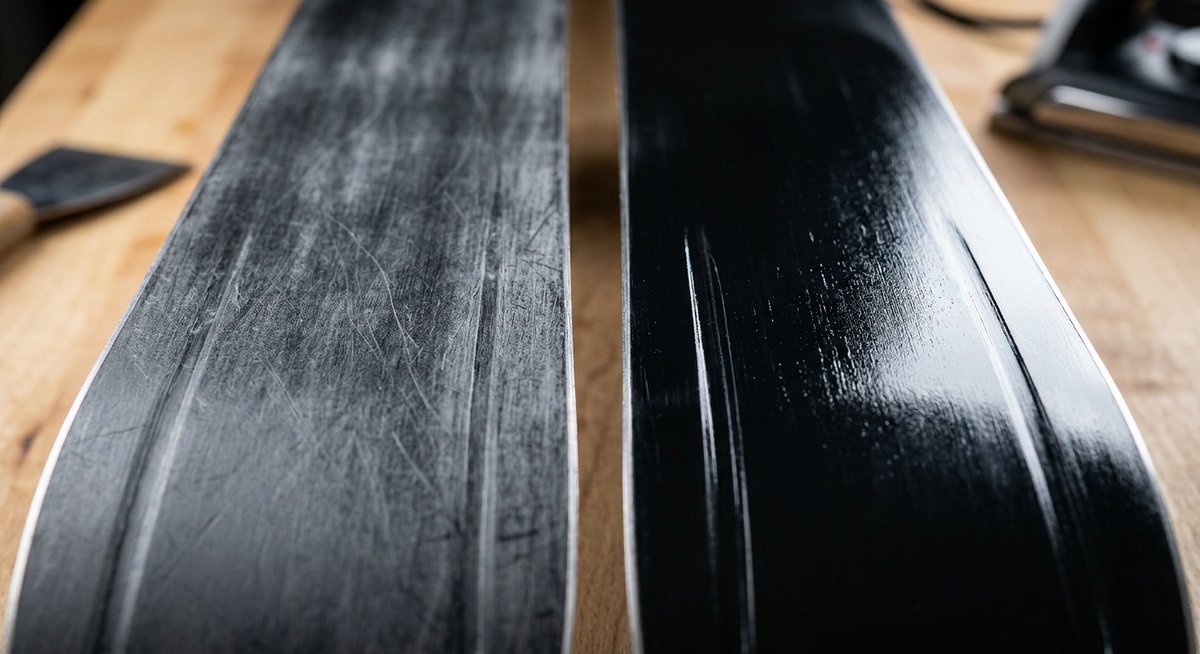
Visual Signs on the Base
Flip your ski base-up and look at the base material directly. A well-waxed base appears dark, slightly shiny, and uniform in color — almost like damp graphite.
White or chalky patches are the clearest warning sign. That discoloration is oxidation: the polyethylene base material drying out and degrading from UV exposure and friction. Visible scratches that cut through the wax layer and expose raw, pale base material are also a red flag, since those bare spots absorb moisture unevenly and accelerate further damage.
On-Snow Performance Cues
On the hill, a wax-starved ski feels sticky and slow — particularly noticeable on flat runouts where momentum carries you instead of glide. The ski almost seems to grip the snow rather than skim it.
A grabby sensation through variable or wet snow is another reliable cue. Skiers often notice this first on cat tracks or gentle traverses, where a properly waxed ski would coast but a dry one forces you to pole. If you’re working harder than the terrain demands, your base is telling you something.
| Signal | What It Looks/Feels Like | Urgency |
|---|---|---|
| White/chalky patches on base | Dull, pale discoloration on dark base material | Wax before next ski day |
| Dry, matte base color | Base looks faded rather than dark and uniform | Wax soon |
| Exposed scratches | Light-colored lines cutting through base | Wax immediately; inspect for repair |
| Increased drag on flats | Skis slow abruptly on runouts and cat tracks | Wax before next run |
| Grabby feel in variable snow | Skis stick or hesitate instead of gliding smoothly | Wax before next ski day |
Choosing the Right Ski Wax for the Conditions
Match your wax to snow temperature and moisture level — not air temperature alone. Hydrocarbon wax covers everyday recreational skiing. Fluorocarbon blends add speed in wet or high-humidity conditions. Universal wax works across a broad range but sacrifices precision. Getting this choice right is the single biggest factor separating a fast run from a sluggish one.
Wax Types Explained
Hydrocarbon wax is the workhorse of recreational skiing — affordable (typically $8–$20 per block from brands like Swix or Toko), durable, and effective across most cold and moderate snow conditions. Fluorocarbon wax repels water more aggressively, making it the go-to for wet spring snow or race days. Note that the FIS banned certain fluorocarbon waxes starting in the 2023/24 season due to environmental concerns over PFAS compounds — check current regulations if you race competitively.
Universal or all-temperature wax sits in the middle: one formula, broad coverage, and a forgiving choice for beginners who aren’t yet reading snow conditions with precision. Most recreational skiers can get through an entire season with a two-wax quiver — a cold/blue hydrocarbon for dry packed snow and a warm/red hydrocarbon for softer conditions.
Wax Temperature Selection Table
Wax manufacturers color-code their products by temperature range, and while exact ranges vary slightly by brand, the system is consistent enough to use as a reliable framework. Always check the packaging label — most brands print both air and snow temperature ranges directly on the block.
| Snow Temp Range | Snow Type | Recommended Wax Color / Hardness | Typical Use Case |
|---|---|---|---|
| Below -12°C (10°F) | Dry, fine-grained, powder | Green (extra hard) | Very cold, low-humidity days |
| -12°C to -7°C (10–20°F) | Dry, packed powder | Blue (hard) | Typical cold-weather resort skiing |
| -7°C to -2°C (20–28°F) | Packed, transitional | Violet / Purple (medium) | Variable mid-season conditions |
| -2°C to +2°C (28–36°F) | Soft, moist, groomed | Red (soft) | Warm afternoons, slushy groomers |
| Above +2°C (36°F) | Wet, heavy, spring snow | Yellow (very soft) | Spring corn snow, bluebird days |
One practical note: when conditions fall between two color ranges — a common situation during variable spring days — go with the softer (warmer) wax. A slightly soft wax in cold snow creates mild drag; a hard wax in warm wet snow creates far more resistance and can cause the base to pick up debris.
What You Need: Beginner Waxing Kit and Cost Breakdown
A complete hot waxing setup costs between $60 and $120 upfront — roughly two to three shop wax jobs at $20–$40 each, meaning the kit pays for itself quickly. The iron-free alternative drops that entry cost to as little as $15. Which kit makes sense depends on how often you ski and how much glide performance matters to you.
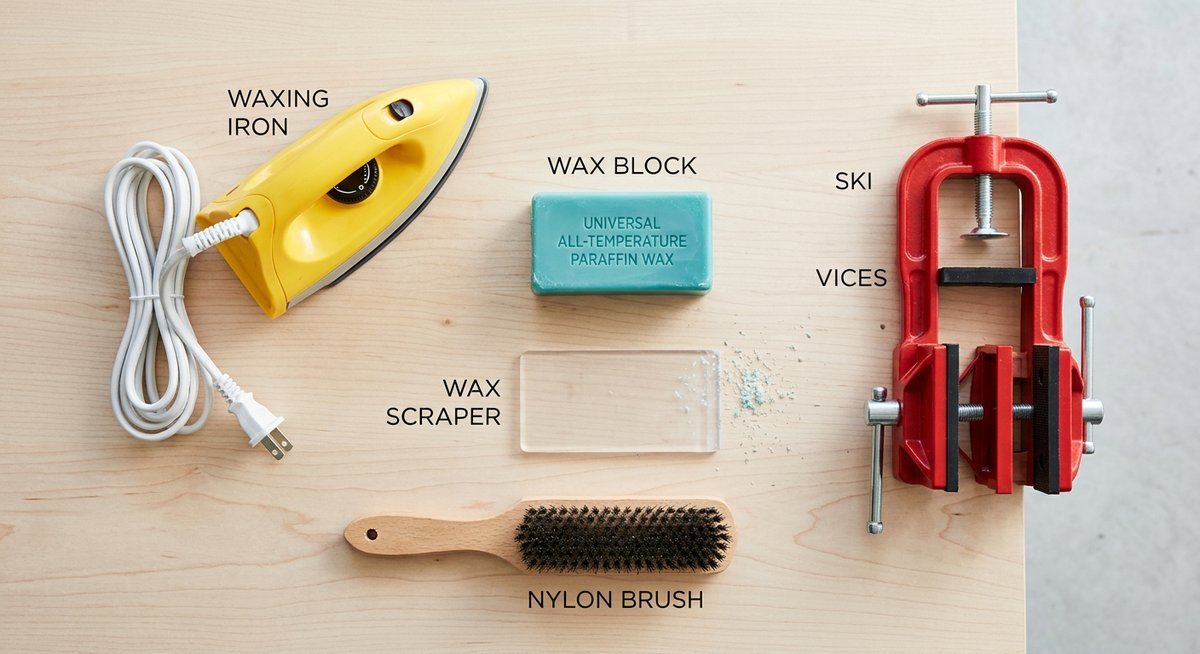
Essential Tools for Hot Waxing
The iron is the biggest variable in your budget. A dedicated ski waxing iron with adjustable temperature control runs $30–$60; a basic household clothes iron can technically work, but it lacks precise temperature regulation and risks overheating the base. Spend the extra $20 — it’s worth it.
Beyond the iron, the rest of the kit is inexpensive. A block of hydrocarbon base wax costs $8–$15 and covers multiple pairs of skis. A quality plastic scraper runs $5–$10, and a nylon finishing brush — essential for opening the base structure after scraping — adds another $10–$20.
Securing the ski is the step beginners most often skip. A proper waxing vise or tabletop clamp set holds the ski base-up without wobbling, making every other step safer and more precise. Expect to pay $15–$30 for a basic vise setup.
| Tool | Purpose | Estimated Cost |
|---|---|---|
| Ski waxing iron | Melts and bonds wax into base | $30–$60 |
| Hydrocarbon base wax | Primary glide layer | $8–$15 |
| Plastic scraper | Removes excess wax after cooling | $5–$10 |
| Nylon or brass brush | Opens base structure, improves glide | $10–$20 |
| Waxing vise / clamps | Holds ski stable during application | $15–$30 |
| Total | $68–$135 |
Rub-On / Paste Wax Option
No iron, no vise, no problem — rub-on wax requires nothing more than a wax block or paste ($10–$20) and a cork or nylon buffer ($5–$10) to work it into the base. Total kit cost lands around $15–$30, making it the obvious starting point for casual skiers who hit the mountain a handful of times per season.
The tradeoff is durability. Rub-on wax sits on the surface rather than bonding into the base material, so it wears off in about one to two days of skiing — sometimes faster in abrasive or wet conditions. For a quick mid-trip refresh at the lodge, rub-on works great. For long-term base protection, hot waxing remains the standard.
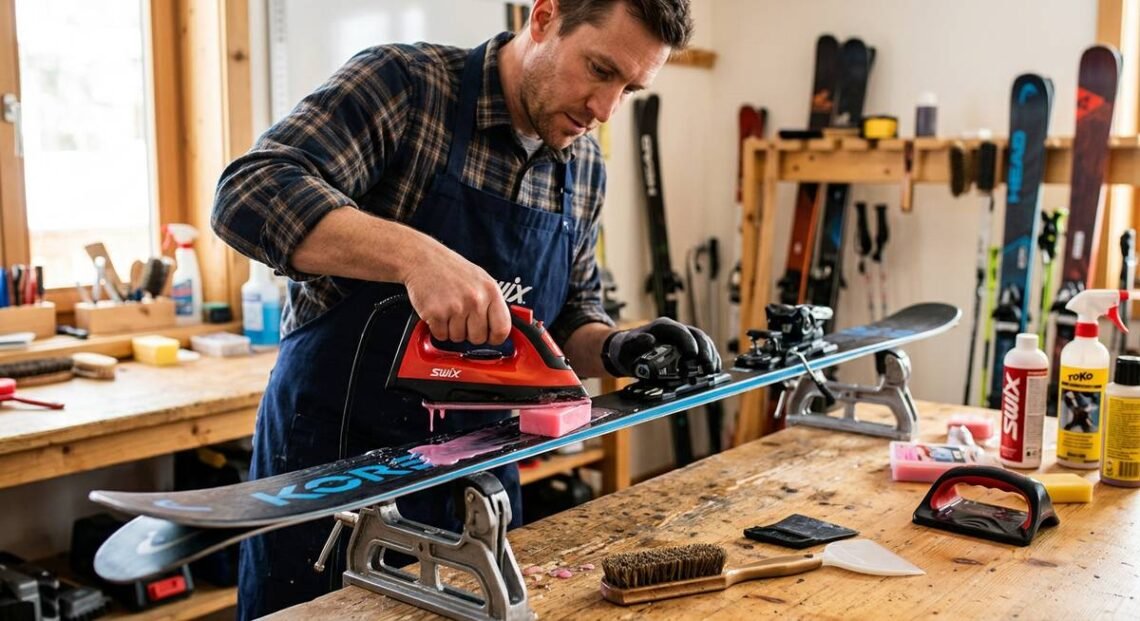
How to Hot Wax Your Skis Step by Step
Hot waxing takes roughly 45–60 minutes start to finish and produces a durable, deep-penetrating wax job that rub-on methods can’t match. Five stages: clean, apply, cool, scrape, brush. No shortcuts worth taking.
Step 1 — Clean and Secure the Ski
Clamp the ski base-up in a vise so it’s stable and at a comfortable working height. A wobbly ski on a kitchen table is a recipe for uneven work and a gouged floor.
Remove old wax with a dry scrape using your plastic scraper, running it tip to tail in one direction. For a deeper clean, apply a citrus-based base cleaner, let it sit for 30 seconds, then wipe away with a lint-free cloth — this pulls out embedded dirt that scraping alone misses.
Before touching the iron, inspect the base carefully. Deep core shots — gouges that expose the white polyethylene core — need P-tex repair before waxing. Wax won’t seal structural damage; it’ll just fill the hole temporarily and pop out on the first run.
Step 2 — Set the Iron Temperature and Apply Wax
Set your waxing iron between 110–130°C, adjusting within that range based on wax type — harder cold-weather waxes tolerate the higher end, softer warm-weather waxes need less heat. A dedicated ski iron holds temperature more consistently than a household clothes iron, which is why most technicians recommend against improvising.
Touch the wax block to the iron’s soleplate and drip molten wax in a loose zigzag pattern down the full length of the base. You want coverage roughly every 2–3 centimeters — not a flood, just enough dots to spread evenly.
Iron the wax in using slow, steady passes from tip to tail. Keep the iron moving at all times. Holding it stationary for even a few seconds can overheat the base material, causing irreversible delamination or a scorched, whitened patch that no amount of future waxing will fix.
Step 3 — Cool, Scrape, and Brush
Let the ski rest at room temperature for a minimum of 20–30 minutes. Rushing this step is the most common beginner mistake — wax that hasn’t fully hardened scrapes unevenly and won’t bond properly to the base structure.
Once cool, scrape the entire base tip to tail with firm, overlapping strokes using the plastic scraper held at roughly a 45-degree angle. You’re removing the surface wax; the wax that matters has already soaked into the base. The scraper should produce long, continuous ribbons — short crumbles mean the wax is still soft.
Finish with a nylon brush (for general use) or a brass brush (for colder, harder waxes), again working tip to tail. Brushing opens the base structure’s micro-texture, which creates the glide channels that make a properly waxed ski noticeably faster than a scraped-only base. According to Swix’s wax guide, the brushing step accounts for up to 30% of your final glide performance.
| Step | Action | Common Mistake to Avoid |
|---|---|---|
| 1. Clean | Scrape old wax, apply base cleaner, wipe down | Skipping the clean — old dirt traps under new wax |
| 2. Apply | Drip wax in zigzag, iron tip to tail with steady motion | Holding the iron still — causes base burn and delamination |
| 3. Cool | Rest at room temp for 20–30 minutes minimum | Scraping too soon — wax hasn’t bonded, peels off unevenly |
| 4. Scrape | Plastic scraper at 45°, firm overlapping strokes, tip to tail | Scraping too aggressively — gouges base or removes too much wax |
| 5. Brush | Nylon or brass brush, tip to tail, 10–15 passes | Skipping this step — kills 30% of your glide performance |
Waxing Alpine vs. Nordic vs. Backcountry Skis
The hot wax process above applies to all ski types, but each discipline has specific considerations that affect wax choice, application zones, and frequency. Alpine skis are the simplest case. Nordic and backcountry skis add a layer of complexity — literally.
Alpine Skis
Standard alpine skis have a single sintered or extruded polyethylene base that runs the full length. The entire base gets glide wax, tip to tail, using the hot wax method described above. Sintered bases (found on mid-to-high-end skis) absorb more wax and hold it longer than extruded bases, so they perform better but also need more frequent waxing — roughly every 3–5 ski days.
Nordic Classic Skis
Classic cross-country skis need two types of wax: glide wax on the tip and tail sections, and grip wax (also called kick wax) in the “kick zone” — the middle third of the ski underfoot. Grip wax provides traction for the kick-and-glide stride, and it’s temperature-sensitive in the same way glide wax is. Apply grip wax in thin layers, corking each one smooth, and test on snow before adding more. Too much grip wax makes the ski sluggish; too little and you’ll slip on uphills. Toko’s knowledge center provides detailed grip wax layering charts by temperature.
Backcountry and Touring Skis
Backcountry and ski touring setups face a unique challenge: climbing skins. Adhesive skins stick to the base for the uphill, and when removed, they can pull fresh wax off the surface. Wax your touring skis the night before — never right before applying skins — so the wax has time to fully cure. Some backcountry skiers apply a thin layer of skin-safe glide wax (available from Swix and Pomoca) that’s formulated to resist adhesive pull. Hot wax the tips and tails normally, and consider rub-on wax for quick mid-tour refreshes at the summit.
Storage Waxing: End-of-Season Care
Apply a thick coat of soft (warm-temperature) wax at the end of the season and leave it on — do not scrape. This storage wax seals the base from oxidation and humidity during months of sitting in a garage or closet. When the next season arrives, scrape and brush the storage wax off, then apply a fresh coat matched to current conditions. Five minutes of work in the spring saves a base repair in the fall.
Frequently Asked Questions
How often should you wax skis?
Every 3–5 days of active skiing for hot wax, or every 1–2 days for rub-on wax. The actual interval depends on snow conditions — abrasive man-made snow and spring slush wear wax faster than cold natural powder. Check for white patches and drag as your real-world indicator rather than counting days mechanically.
Can you wax skis without an iron?
Yes. Rub-on wax and paste wax applied with a cork produce decent short-term results. Rub the wax directly onto the base like a crayon, then buff it in with a cork using firm, tip-to-tail strokes. The result won’t last as long as hot wax — typically one to two days — but it’s a solid option for casual skiers or a quick refresh between full wax jobs.
What temperature should a ski waxing iron be set to?
Between 110°C and 130°C (230–265°F), depending on the wax hardness. Softer warm-temperature waxes melt at the lower end of that range; harder cold-temperature waxes require more heat. The wax should melt smoothly when touched to the iron without smoking. Visible smoke means the iron is too hot and you’re degrading the wax — turn it down immediately.
Does waxing skis actually make a noticeable difference?
A measurable one. Properly waxed skis glide 10–15% faster on flat terrain compared to unwaxed bases, according to testing by SkiPost. Beyond raw speed, waxed bases handle variable snow more predictably and are easier to control. The difference is most noticeable on flat runouts, cat tracks, and in wet snow where an unwaxed base creates significant friction.
Is it worth waxing skis yourself vs. paying a shop?
Financially, a home waxing kit ($68–$135) pays for itself after two to three professional wax jobs ($20–$40 each). Beyond cost, DIY waxing lets you tune your wax selection to specific conditions — something a one-size-fits-all shop job doesn’t offer. The main reason to use a shop is convenience or if your bases need machine grinding that only professional stone-grinders can do.
Can you over-wax skis?
Not in any meaningful way. Excess wax gets scraped off during the finishing step, so the base only retains what it can absorb. Waxing too frequently wastes wax but doesn’t damage the base. The only real risk is using too much heat — an overheated iron can melt the base material itself, causing permanent warping or delamination that no amount of wax will fix.
What happens if you never wax your skis?
The polyethylene base oxidizes, turning white and dry. Oxidized bases lose their molecular structure, making them progressively harder to wax effectively even when you eventually try. Severe oxidation requires professional base grinding to remove the damaged layer — a $40–$60 repair that proper waxing prevents entirely. Unwaxed bases also absorb dirt and debris more readily, which accelerates wear.
Wax Your Skis, Ski Better
Ski waxing is a 45-minute job that costs less than a lift ticket coffee and makes every run feel noticeably different. Start with a universal hydrocarbon wax and the basic hot wax method. Upgrade to temperature-specific waxes once you can feel the difference — and you will. Keep an eye on your bases, wax before the white patches show up, and apply a storage coat at the end of each season. Your skis will last longer, perform better, and reward the small effort many times over.